Showing posts with label rudder cheeks. Show all posts

Tuesday, February 19, 2013

Rudder cheeks and boomkin installed!

Finally, I was able to get the rudder cheeks and boomkin installed. It seemed like a long time to get this task completed. Now I just need to pull a few chain plates and see how they look. Then that will complete the standing rigging system for now. I plan on changing out all the standing rigging cables in a few years. I will inspect them all just in case..

I did replace the boomkin tangs, stays (cables) and turn buckles as you will see below.


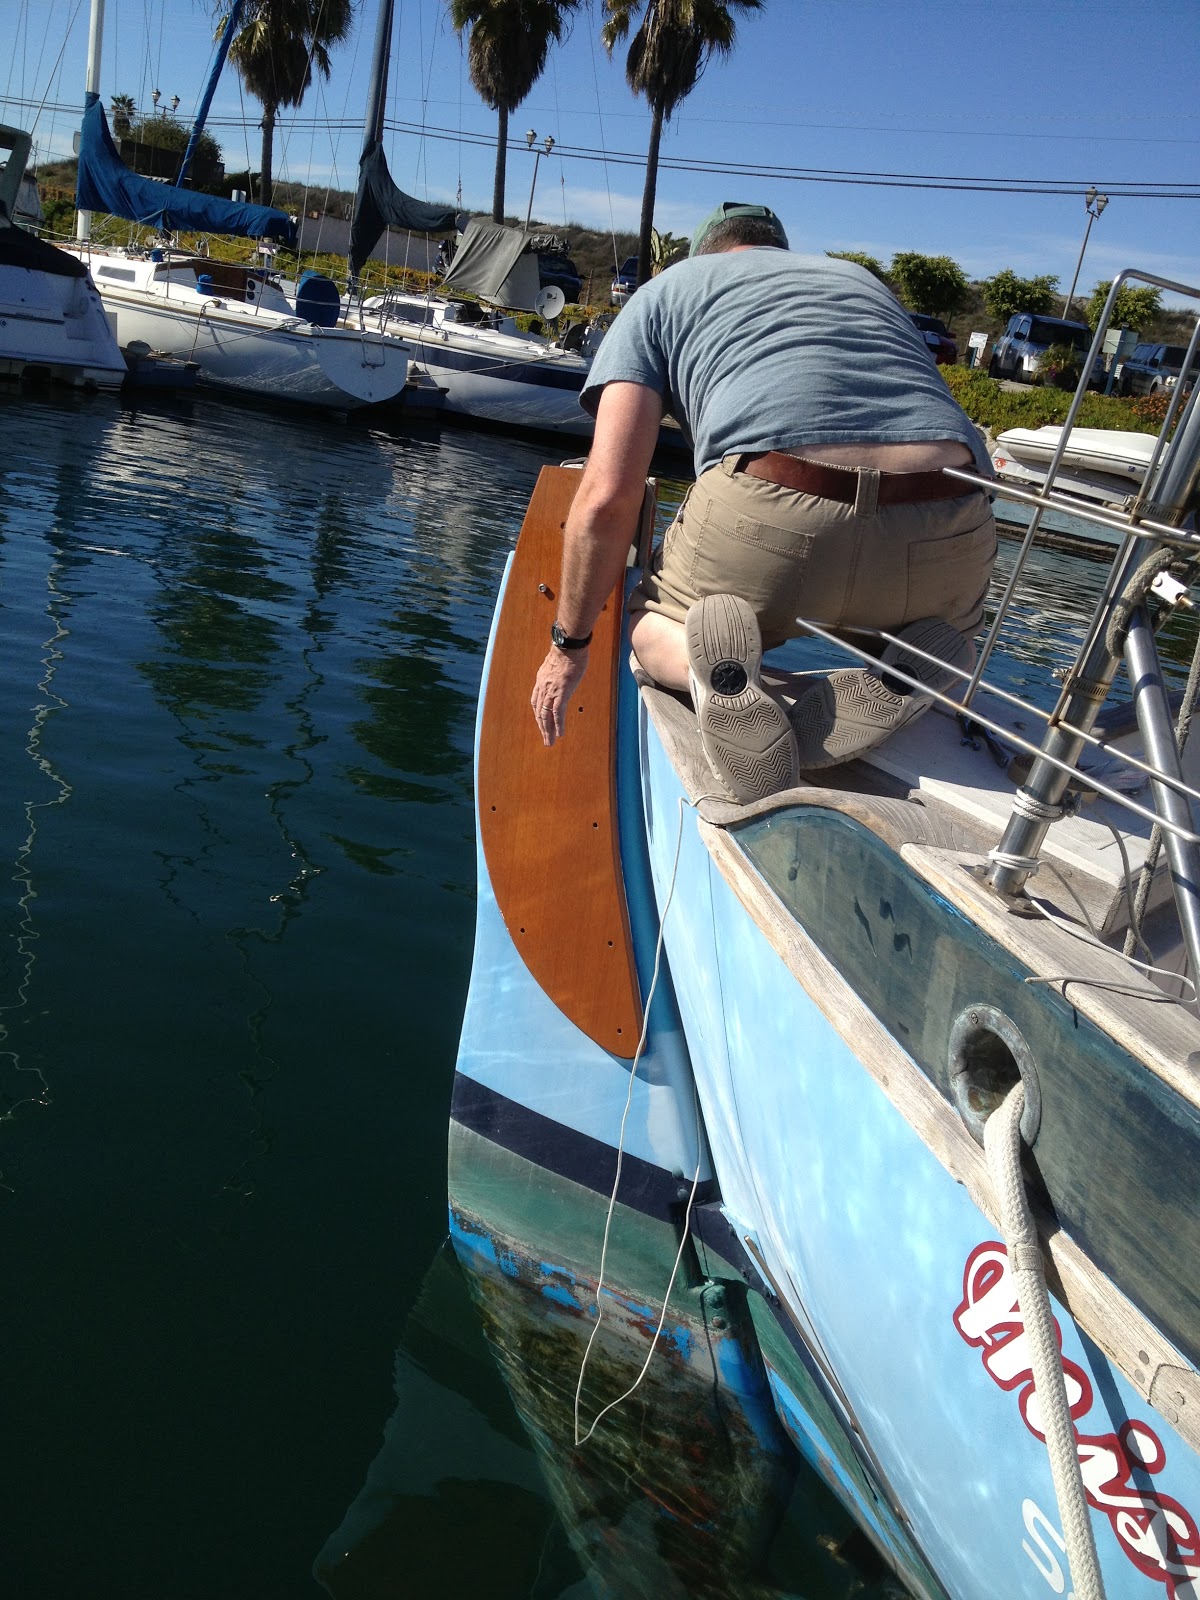
The easy bolts first.

My best view!

Too long in this position and the ice tea wants to come back up!

Just a nice picture with palm trees in the background.

Gratuitous wiener dog pictures for Nancy! Miss Mae enjoying the sun.

And when she gets too warm.

The old versus the newboomkin tangs. FYI these old tangs were known for breaking and bringing down a mast or two. It was a no brainer to replace them. They would break at the top hole in the picture. There is very little metal there for how much tension the get.

The old ones didn't leak. Do you think I need a bottom paint job!

New tang and stay installed. I had the rope tied to it in case I dropped it while installing it.

And the cheeks installed and the boomkin installed with the back stay attached. (The back stay is the "cable" coming from the middle top of the picture to the end of the boomkin...it holds up the mast.)
See the rope hanging off the end and going into the water? Yeah, well, that is for the diver so he knows where to look for my craftsman 3/8" ratchet and socket that decided to jump out of my hands! Did I tie a rope to that...nooo, I won't drop it. I'll be "careful".  (Curtis this is all your fault...this is what we were talking about this weekend!)
By the way the diver that cleans my hull will fetch my dropped items for free...if he can find them! Maybe he can pick up my $12 stainless bolt and rubber sanding block from a few months ago too. They say global warming is causing the ocean level to rise....it is actually me just dropping stuff that is raising the ocean level. Sorry Mr. Gore!
 
I know the wiener dog floats......don't ask.

Thursday, February 14, 2013

Cetol(ing) the rudder cheeks and boomkin

Just so you know I'm not slacking off after work I get home and put one layer of cetol on each night. Here is how the layer count goes:

Rudder cheeks = 2 coats of penetrating epoxy, 2 coats of cetol teak light and 3 coats of cetol gloss. They are done.!
Boomkin and the six boomkin spacer blocks = 2 coats of penetrating epoxy, 2 coats of cetol teak light. Only 3 coats of cetol gloss to go before I can install them! Maybe I can get it installed on Sunday or Monday. That would be nice!


Wednesday, February 6, 2013

Finally getting to the rudder cheeks and boomkin again

Man it seems like time is flying by and passing me up. I picked up my rudder cheeks and boomkins right before Christmas and here it is early February!  Sunday before the super bowl I gave them all a coat of penetrating epoxy. This was the second coat for the cheeks and the first for the boomkin. Monday night I went out and took the cheeks and boomkins down from their hanging position in the garage last night to wash the epoxy blush off. This time I didn't wash them in the kitchen sink! You can read about that here.

 I hung the boomkins back up and gave them another coat of penetrating epoxy. The last one for them before they get the cetol. The cheeks I sanded them down to get the drips and runs out (How could I get drips and runs when I was thinking I didn't put enough epoxy on?) to prepare them for the gazillion six coats of cetol I need to put on. I am going to do the top, let them dry then do the bottom. So this should take some time. I really want to try and get a nice smooth finish on the cheeks and I'm not so good at smooth. So we'll see how they turn out. the main thing is that they get protected. We all know protection doesn't have to be pretty.....right?

Here is the boomkin hanging with it's second coat of epoxy drying.
Sorry about all the clutter in the background...I'm building a boat!


And the cheeks with their first coat of cetol teak light. They "look" OK now, lets see tomorrow.
Look in the upper left corner you can see the engine pan tops. I also coated them with penetrating epoxy on Sunday.

Stay tuned and watch epoxy dry!


Friday, December 28, 2012

Dreams of rudder cheeks and boomkins danced through my head

I guess by the title you can tell I dream of boat projects even at Christmas time! I picked up the new mahogany rudder checks and boomkin from H &L Marine on 12-21-12.

 Took them to the boat and checked the fit. All seemed well so I brought them home to put many coats of protection on them. (H&L always does a great job! Plus they are nice to deal with.)

The very top of the rudder cheeks get s a small block across the top. The one I took off was just a rectangular piece of wood with square edges. It really didn't look right sitting on top of the curvy cheeks! I thought that the new piece should have a bit more flare to it and match the cheeks. So I clamped the rudder checks to the stainless steel rudder housing and screwed the top piece on from the bottom. (The original was glued on.) I grabbed my rasp file and plane and went to work. The reason I needed the plane is that the new piece was about an 1/8" longer on one side. I could have cut it with the table saw but wanted to try the plane. I haven't really used a plane before but really want to learn how to use one as I think it will be a good tool to have when we take off cruising.
Any way below are a few pictures I took as I filed and shaped the top piece by hand. Let me know what you think. Like it or no?


All in all I think it came out nice and it looks so much better than just a rectangular piece of wood sitting up there.
Now I get to coat them all with 2 coats of penetrating epoxy, two coats of cetol light and 3 coats of cetol clear....stay tuned!

P.S.
I will be taking the unfinished boomkin to the boat for a complete test fit. I will figure out where the stern pulpit will be mounted, the not-yet-bought main sheet hoop and the monitor wind vane.

Tuesday, November 20, 2012

Rudder Cheeks and Boomkin Inspection and Termites and $8 water sound

A couple of weekends ago I removed the rudder cheeks and boomkin to get a better look at the shape they were in and refinish them if they were salvageable.  I removed the back stay and tied it off to the port side lifeline stanchion. I then took both of the halyard lines and tied them to the aft cleats. I used the mast winches to put some tension on them. I do not have as much concern now about the mast staying up as I did when I took the front stays off when I replaced the bowsprit. I feel confident that it will stay up. ( I hope I didn't just jink myself!)
The first order of business was to take the rudder cheeks off. I tied a rope around the top of the tiller box so when I removed the bolts I wouldn't lose it in the water. (It's 25 feet deep here at low tide.) I am certified in scuba, but I really don't want to dive in the harbor....but I would if I had to!


As you can see there are a bunch of bolts holding the rudder cheeks on. I tied a small rope to my ratchet and open end wrench that I used to remove the bolts.....just in case. Yes I did tie the other end to the boat thank you. The nuts came off fairly easy but getting them out of the hole was a learning experience I would have to pay for. By that I mean i figured that i could lightly tap the bolt out using a screwdriver. As I tapped the first one started to move then got stuck. So I "tapped" it a bit harder. Ya know water makes an $8 dollar sound when a long stainless steel bolt flies from your hand into the water. Why do I make a big deal out of am $8 dollar bolt when I there are a lot more expensive items I have to replace or HAVE replaced so far? Because I could have reused that bolt had I not donated it to Davey Jones locker! I must say that after that I did not drop any more items in the water that day. I'm certain I will donate again soon.

I was able to remove the rest of the bolts and pull the cheeks off in one piece. (OK two pieces actually, one per side.) I was also able to keep from drooping the tiller box in the drink also.

The cheeks didn't look to bad...until I flipped them over.

 
Look at them closely. See all those little balls. That is actually crap. Termite crap to be exact. The little buggers ate my cheeks! Dang it! Now I have to replace those too! But the top piece of wood that sits on the top of the tiller box was still in great shape....big whoop it is about 6x8 inches. FYI, if you look at the pictures you can see where the tiller box (a stainless steel plate in a U shape) fits into the cheeks. 
 
 OK onto to the boomkin. I hope the little buggers didn't get that also...we'll see.

(Side note...look at the color of the fiberglass where the cheek blocks were. A beautiful blue color! That is how the topsides are suppose to look. )
 
 
There are three bronze bolts holding each side of the boomkin on. These bolts go through the boomkin, through the spacer blocks, through the deck and into the lazerette. The nuts came off easy but the bolts did not want to go through the spacer blocks or the boomkin. So I took each side off as an whole unit or assembly. I figured I could disassemble them at home in the garage later.
 
I took the boomkin stays off also. I have a new set plus new tangs to replace.

At home in the garage I set to remove the bronze bolts from the boomkin. Yeah.....easier said than done. I had to beat them out of there. Doing so I buggered up the threads EVEN with the nuts on them. I did chase all the threads with wit a die. All of them cleaned up except for one of them. So I will have to buy one.

OK so the bolts are out and the spacer blocks should just pop right off with just a few smacks with the hammer. WRONG!!! They would not budge at all. So I put a bit more force into it......yup cracked that b***h right in half...the spacer block...heck no the WHOLE PORT SIDE BOOMKIN.
The above picture is what it looked like before I made kindling out of it. I was too pissed to take a picture. I'm still pissed! But wait if that broke with just a hard hammer blow that it wasn't too sound to start with. So now I am thankful! (It is almost Thanksgiving here in the US for all you overseas viewers.) By the way I did not see one termite turd in the boomkin. But I did notice that the previous owners did put a nice coat of paint on the topside of the boomkin while the underside was raw wood from the previous coats of varnish flaking off.  I found out with the bowsprit...beware of fresh paint on a boat for sale, it usually hides something bad under it. My bowsprit being case in point! 
I took the boomkin and the rudder cheeks over to H&L Marine  last Wednesday (11-14-12) to have them build new ones for me. I just don't have the wood working equipment to build new ones. Plus I really don't have the time either. Which is a blessing in this economy.
 
I have a bunch of small boat projects going on in the garage. I'll blog about those later. (rebuilding the merriman winches, polishing the winches, polishing the winch stands, etc)